Fundraise Up utilizes an Analytics API which gives users access to nearly every field during the checkout process. Fundraise Up does integrate with Google Analytics and Facebook natively by adding your Google-ID or Facebook Pixel within the platform, but those integrations do not give you full insights into your Donor Journey. If you are looking to utilize their API to enhance your analytics. This is how to do it!
This is a full guide on how to use the Fundraise Up API with Google Tag Manager to build your donors journey & easily access reports that make a difference.
Why Use Fundraise Up’s API & Google Tag Manager
Fundraise Up does a great job giving you insights within your dashboard (10x better than most cart software & 100x better than most donor platforms). They include impressions, conversions, and conversion rates for each of their Elements (the Fundraise Up Call to actions). This is great for a level one question of “which elements are working”.
These insights begin to muddy the water when you look at your entire marketing plan *outside of the cart.
Fundraise UP does not provide website analytics, just the final step (aka the cart).
Quick Note: If you are transacting less than $250k/yearr online, then the default Google Analytics and Facebook Fundriase Up integration is probably just fine.
When you use Fundraise Up’s Google Analytics integration, it tells you a product of “Fundraise Up” was purchased.
With The API and Google Tag Manager you can see:
- What they donated towards (which fund)
- Are they a recurring donor?
- Custom dimensions such as recurring donor status.
- Any other custom fields you would like to have access to.
🚨ATTN: Google Ads Grant Users 🚨 If you are using the Google Ad Grant. With Tag Manager, you can send an event to Google Analytics whenever someone opens an element and create a Remarketing Audience of all users who opened a fund, but did not give (this will be outside of the Ad Grant scope). If you add budget to your other campaigns, you can create a bid adjustment to send users who did that directly to a donation letter. Increasing clicks and conversions for your retargeting audiences.
How To Tie Your Site Engagement in With Fundraise Element Engagement
Your website has a ton of meaningful interacctions.
Blog: Measure the scroll depth and call to action click through rates (aka Fundraise Up Elements) to know which blogs convert the best & which should be included in your next promotions.
Videos: Measure if people watch your video and where they came from. Then Promote the videos with the highest watch times.
Appeal Information: Do people know what they are giving towards? What would a “Yes” look like to that question?
Fundraise up makes it really easy to sprinkle ccall to actions throughout your website, but you do not want to “Ask for Marriage on the first date” by just measuring transactions.
Imagine you have a 45-page website, but everyone donates through yoursite.com/donate…. Why don’t you just delete the rest of your pages and make the /donate page the home page then call it a day? Because every one of those pages should serve a purpose or provides valuable information. Is it working?
When you use Google Tag Manager and The Fundraise up API you can tell that story of the donor.
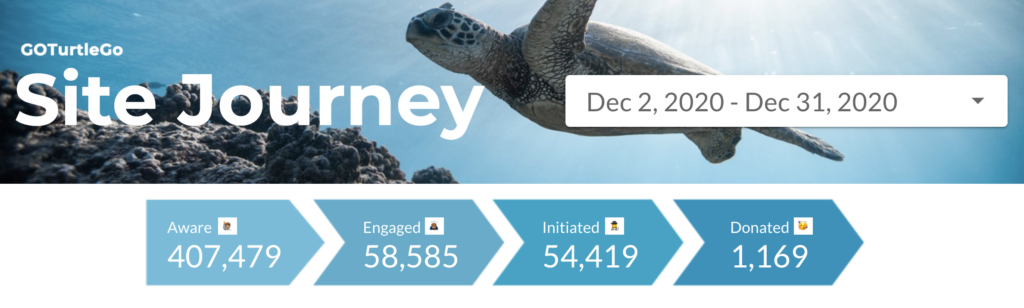
Facebook Traffic is
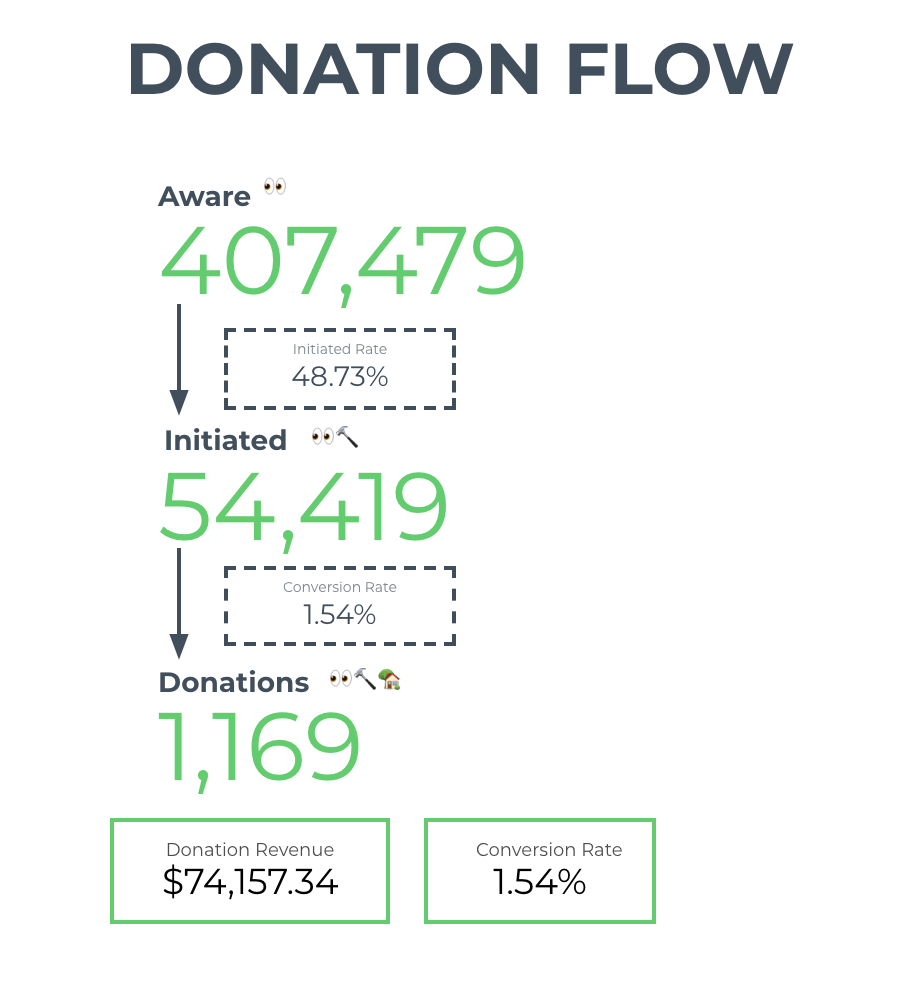
500 Impresions > 400 Aware > 250 Engaged > 50 Inititated > 10 Donated
Google Paid Traffic
100 Impressions > 80 Aware > 75 Engaged > 50 Initiated > 40 Donated
That is a lot more meaningful than “We Received 50 Donations”
Using the Fundraise Up API for Datalayer Pushes
We will be utilizing datalayer pushes to give all thte information to GTM. I have written this datalayer.push for you. If you wanted to learn more, this is the best guide I have found on the internet. https://www.analyticsmania.com/post/datalayer-push/
In short, the Data Layer is a place to store information temporarily which you can then send to other platforms.
Step #1: The Code To Implement
You will need to place the following code in the <head> of your website. This will not slow your site down as it is just listening for the Fundraise Up API Calls.
This is what the following javascript is doing.
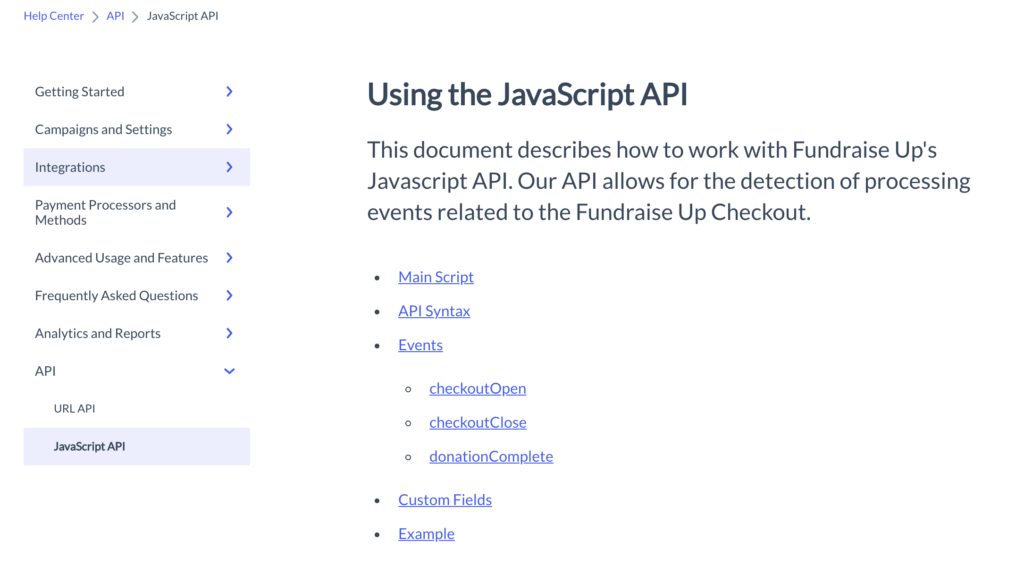
- Listening for Fundraise Up API Events https://help.fundraiseup.com/js-api
- Looking for the Datalayer
- If no Data layer exists, it creates a new one.
- Then pushes the event values into the Google Tag Manager Datalayer.
<script>
//This fires when any donation modal is opened.
FundraiseUp.on('checkoutOpen', function(details) {
const now = new Date();
window.dataLayer = window.dataLayer || [];
dataLayer.push({
'event': 'Checkout Open',
details : {
campaign: details.campaign ,
customFields : {
userId : details.campaign.id,
name : details.campaign.name,
dateAndTime : now
},
livemode: details.livemode,
utm : details.utm
}
})
console.log(dataLayer);
});
</script>
<script>
//this fires when any donation modal is closed
FundraiseUp.on('checkoutClose', function(details) {
const now = new Date();
window.dataLayer = window.dataLayer || [];
dataLayer.push({
'event': 'Checkout Close',
details : {
campaign: details.campaign ,
customFields : {
userId : details.campaign.id,
name : details.campaign.name,
status : "Failed",
dateAndTime : now
},
designation : details.designation,
donation : details.donation,
supporter : details.supporter,
livemode: details.livemode,
utm : details.utm
}
})
console.log(dataLayer);
});
</script>
<script>
//this fires when any donation is successful
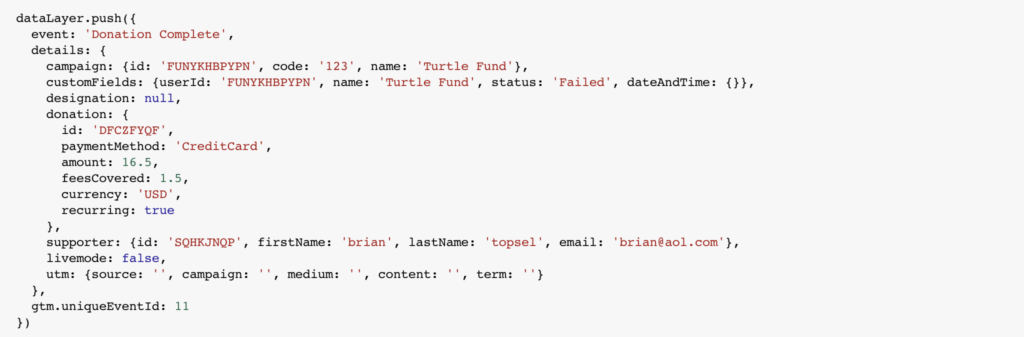
FundraiseUp.on('donationComplete', function(details) {
const now = new Date();
window.dataLayer = window.dataLayer || [];
dataLayer.push({
'event': 'Donation Complete',
details : {
campaign: details.campaign ,
customFields : {
userId : details.campaign.id,
name : details.campaign.name
},
designation : details.designation,
donation : details.donation,
supporter : details.supporter,
livemode: details.livemode,
utm : details.utm
}
})
console.log(dataLayer);
});
</script>Step #2: Set Up Your Variables in Google Tag Manager
Next, you need to set up your Datalayer variables within Google Tag Manager.
Take a look at the datalayer below to access any of the variables you will use.
If you wanted to know the amount of fees covered, you could use a datalayer valuable of details.donation.feesCovered.
I have created a GTM Container which contains all of the available variables for you. You Can Download Our GTM Container Here
How To Install Our GTM Container
- Download this container.
- Navigate to your Tag Manager Container
- In your Admin settings, you will need to select “Import Container”
- Then merge with your existing tags & triggers
Final Thoughts
Ta da! you now have access to all the Fundraise Up fields within your GTM account! Now you can begin to tell your story through data & visualizations!
If you have questions or want this to be implement for your website, Apply To Work With Us.
As fundraise up continues to build their API and dashboards I will update this as well.